Within this article we will be showing the various steps required in configuring a Cisco ASA IPSEC VPN using digital certificates.
These certificates will be signed by a CA (Cisco Router) and downloaded by the Client/ASA using SCEP (Simple Certificate Enrollment Protocol).
Table of Contents
Time/Date
On the client, router and firewall ensure that NTP is configured and all devices have the same time/date.
Configure CA
Next we will configure the Cisco Router as a CA server.
ip http server <– enable the http server
crypto pki server ca-router
database url nvram: <– defnies where the database entries for the ca are written to
database level minimum <– configure the database level
issuer-name CN=ca.www.fir3net.com OU=Demo L=Berks C=UK <– configure the CA issuer name
lifetime certificate 200 <– define the certificate lifetime
lifetime ca-certificate 365 <– define the ca certificate lifetime
lifetime crl 24 <– define the lifetime of the CRL
cdp-url <- define the CRL URL
grant auto <– auto grant requests
no shutdown
Enroll Certificates
Next we will enroll both the ASA and Client with the CA. During this process a root CA and identity certificate will be downloaded from the CA server for both the ASA and the Client via SCEP.
In terms of how each certificates is used, the is shown below:
ASA – Instead of using a pre-shared key the ASA will present its identity certificate to the client during phase 1. To check the authenticity of this certificate the client will use its locally stored root ca certificate.
Client – In addition to X-Auth the client will present the ASA with the identity certificate of the user. The ASA then authenticates this certificate using its locally stored root ca certificate.
Note : When importing enrolling both the ASA and the VPN client a passphrase will be required. This can be obtained from the CA server (router) using the command ‘crypto pki server ca-router password generate’.
Cisco ASA
crypto ca trustpoint trustpoint-asa-skyn3t
enrollment url
fqdn asa-skyn3t.www.fir3net.com
subject-name CN=asa-skyn3t.www.fir3net.com,OU=demo,O=www.fir3net.com,C=UK,St=Berks,L=Wokingham
crypto ca authenticate trustpoint-asa-skyn3t <- obtain ca certificate
crypto ca import trustpoint-asa-skyn3t certificate <- import indentity certificate
Cisco VPN Client
Within the VPN Client within the Certificate Tab click Enroll. You will then be asked to provide the ca server details and request attributes for your user.

Configure VPN
Now we configure the VPN. This will involve creating a pool of IP`s (192.168.2.0/24) for our remote clients and then permitting them access to the inside segment (172.16.0.0/16).
IP Pool / NAT
First of all we create our network objects, These are then used within a manual NAT rule. This will ensure that traffic between the inside segment and the VPN IP pool is not translated.
When then configure our VPN Pool.
object network obj-192.168.2.0_24
subnet 192.168.2.0 255.255.255.0
object network obj-172.16.0.0_16
subnet 172.16.0.0 255.255.0.0
nat (inside,outside) source static obj-172.16.0.0_16 obj-172.16.0.0_16 destination static obj-192.168.2.0_24 obj-192.168.2.0_24
ip local pool VPN-POOL 192.168.2.1-192.168.2.254 mask 255.255.255.0
Phase 1
Our Phase 1 parameters are then configured.
crypto ikev1 enable outside
crypto ikev1 policy 65535
authentication rsa-sig
encryption 3des
hash sha
group 2
lifetime 86400
crypto isakmp identity auto
Phase 2
We then configure our Phase 2 parameters.
crypto ipsec transform-set ESP-3DES-MD5 esp-3des esp-md5-hmac
crypto dynamic-map dynmap 10 set transform-set ESP-3DES-MD5
crypto map IPSEC-RA-MAP 10 ipsec-isakmp dynamic dynmap
crypto map IPSEC-RA-MAP interface outside
Group Policy
A group-policy is then created.
group-policy LAB-CERT internal
group-policy LAB-CERT attributes
default-domain value www.fir3net.com
Tunnel Group
Our tunnel-group is then defined and our previously created trust point, vpn pool and group policy assigned.
tunnel-group LAB-CERT type remote-access
tunnel-group LAB-CERT general-attributes
address-pool VPN-POOL
default-group-policy LAB-CERT
tunnel-group LAB-CERT ipsec-attributes
ikev1 trust-point trustpoint-asa-skyn3t
Certificate Map
A certificate map is created and bound to our tunnel group. This is ensures that the user lands on the correct tunnel group based on their attributes.
crypto ca certificate map MYMAP 10
issuer-name attr cn co fir3net
subject-name attr ou co demo
tunnel-group-map enable rules
tunnel-group-map MYMAP 10 LAB-CERT
Create User
Finally the user is created.
username william password <password>
username william attributes
service-type remote-access
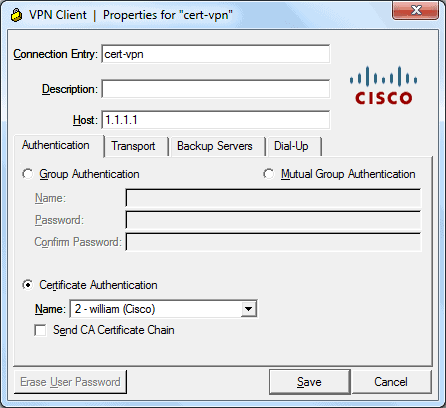
VPN Client
Finally we configure the VPN Client profile and connect to our VPN.
Debug/Commands
Router
– show crypto key mypubkey rsa
– show crypto pki server
– crypto pki server cs-label grant {all | req-id}
– crypto pki server cs-label reject {all | req-id}
– crypto pki server cs-label password generate [minutes]
– crypto pki server cs-label revoke certificate-serial-number
– crypto pki server cs-label request pkcs10 {url | terminal} [pem]
– crypto pki server cs-label info crl
– crypto pki server cs-label info requests
– debug crypto pki server
ASA
– show crypto ca certificates
– debug crypto ikev1 200

- NETCONF & YANG: Automate Network Configs via Python - April 2, 2026
- Palo Alto – How to Configure Your Next-Generation Firewall - April 2, 2026
- How to Harden Linux SSH: Keys, Fail2ban & Ciphers - March 1, 2026
Want to become an IT Security expert ?
Here is our hand-picked selection of the best courses you can find online:
Internet Security Deep Dive course
Complete Cyber Security Course – Hackers Exposed
CompTIA Security+ (SY0-601) Certification Complete course
and our recommended certification practice exams:
Delta Practice Tests