Table of Contents
Introduction
Within this article we will show you how to build a policy based site to site VPN between Microsoft Azure and a Cisco ASA firewall.
Details
Before we dive into the steps it is worth mentioning the versions and encryption domain used within this tutorial,
Versions
| Azure Deployment Mode | ARM (Azure Resource Manager) |
| ASA Version | 9.1(7)4 |
Encryption Domain
| Azure Peer | 13.89.48.98 |
| Azure Endpoint | 172.16.0.0/16 |
| ASA Peer | 109.1.1.1 |
| ASA Endpoint | 192.168.1.0/24 |
Azure Steps
Within Azure, the configuration of the VPN centres around Azure Virtual Networks. In the following steps we will create a VNet, and subnet. Then assign it to a newly created VM. If you have already done this you can skip over these steps.
NOTE Further information on Azure Virtual Networks and the different deployment models can be found here.
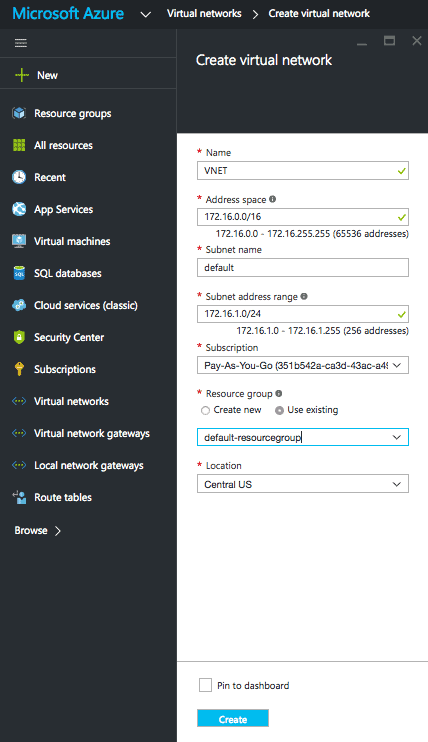
Create Virtual Network
- From the favourites menu select Virtual networks.
- Click Add.
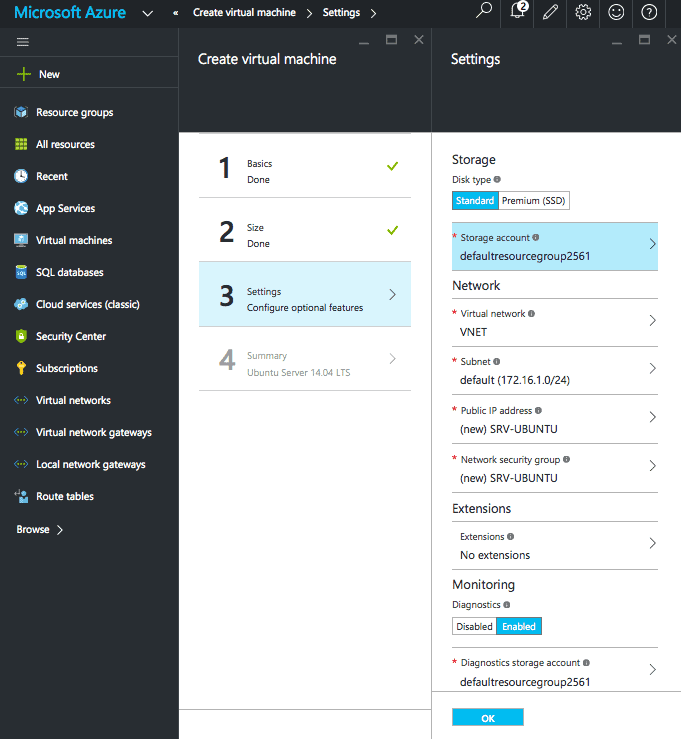
Create Virtual Machine
- From the favourites menu select Virtual machines.
- Click Add.
- Choose your image. In this example we will use Ubuntu 14.04.
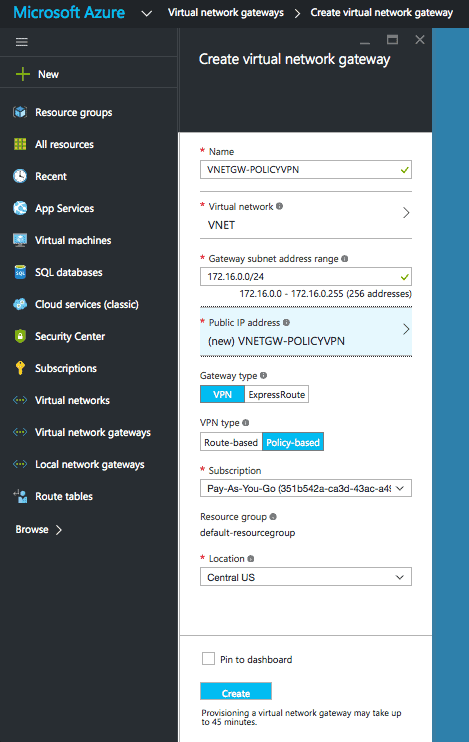
Create Virtual Network Gateway
- From the favourites menu select Virtual network gateways.
- Click Add.
- Add the necessary settings. The ones to note are,
- Virtual Network – When you add the previously created Virtual Network it will provide you with a Gateway subnet range. This will be used by Azure to build a gateway subnet. Gateway subnets are only used for VPNs within Azure.
- Public IP – Select ‘create new’ and then ok.
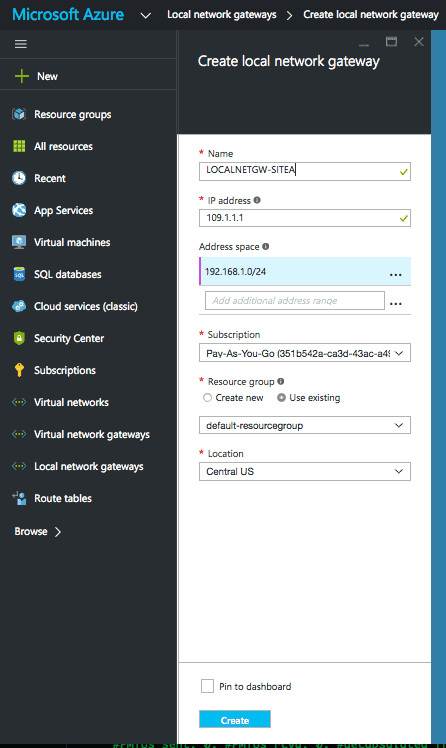
Create Local Network Gateway
This step may confuse some, as though it is named Local Network Gateway, it represents the remote side (peer/endpoint).
- From the favourites menu select Local Network Gateway.
- Click Add.
- Add the ‘IP Address’. This is the remote peer IP.
- Add the ‘Address space’. This is the remote endpoint/endpoints.
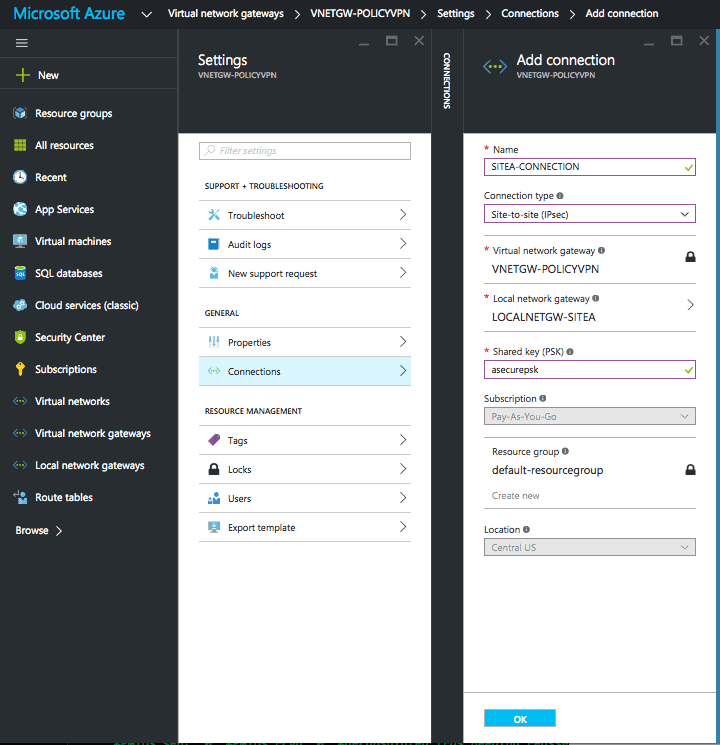
Create Connection
- From the favourites menu select Virtual network gateways.
- Select VNETGW-POLICY.
- Goto Settings.
- Click Connections.
- Click Add.
- Add the necessary settings,
- Connection type : site-to-site (IPsec)
- Gateways : The virtual/local network gateway previously created
- Shared key (PSK) : <psk>
Cisco ASA
Below provides the necessary ASA configuration.
Object-Groups
First we configure the object groups for encryption domain endpoints.
object-group network AZURE-NET
  description Azure Virtual Network
  network-object 172.16.0.0 255.255.255.0
object-group network ONPREM-NET
  description OnPrem Network
  network-object 192.168.1.0 255.255.255.0
Encryption Domain
We then configure the encryption domain, using the previously created object groups.
access-list AZURE-VPN-ACL extended permit ip object-group ONPREM-NET object-group AZURE-NET
NAT
NAT is configured to exclude the traffic to/from the endpoints.
nat (inside,outside) 1 source static ONPREM-NET ONPREM-NET destination static AZURE-NET AZURE-NET
Phase 1
The Phase 1 parameters are then defined.
crypto ikev1 enable outside
crypto ikev1 policy 5
  authentication pre-share
  encryption aes-256
  hash sha
  group 2
  lifetime 28800
Phase 2
Then then phase 2 parameters.
crypto ipsec ikev1 transform-set azure-ipsec-proposal-set esp-aes-256 esp-sha-hmac
crypto ipsec security-association lifetime seconds 3600
crypto ipsec security-association lifetime kilobytes 102400000
Tunnel Group
The tunnel group with the preshared key is configured.
tunnel-group 13.89.48.98 type ipsec-l2l
tunnel-group 13.89.48.98 ipsec-attribute
 ikev1 pre-shared-key <PSK>
Crypto
The encryption domain, peer and phase 2 parameters are then all assigned to a tunnel group.
crypto map azure-crypto-map 1 match address AZURE-VPN-ACL
crypto map azure-crypto-map 1 set peer 13.89.48.98
crypto map azure-crypto-map 1 set ikev1 transform-set azure-ipsec-proposal-set
crypto map azure-crypto-map interface outside
Additional
Finally we avoid fragmentation by clamping the MSS, and maintain TCP state table info when the L2L VPN re-establishes the tunnel.
sysopt connection tcpmss 1350
sysopt connection preserve-vpn-flows
Confirm
Once you have configured the VPN, use the following commands to confirm that the VPN is functioning correctly.
ASA Phase 1
To confirm that phase 1 has successfully established use the following command. The output should show MM_ACTIVE.
ciscoasa-9.1(config)#  show crypto isakmp

IKE Peer: 13.89.48.98
    Type    : L2L             Role    : responder
    Rekey   : no              State   : MM_ACTIVE
ASA Phase 2
To ensure that phase 2 has successfully established use the following command – show crypto ipsec sa peer 13.89.48.98
Once run confirm that,
- Security associations are present
- The tunnel is both encrypting and decrypting packets. This can be determined by ensuring that the #pkts encap/decap totals are incrementing.
ciscoasa-9.1(config)# show crypto ipsec sa peer 13.89.48.98
interface: outside
    Crypto map tag: azure-crypto-map, seq num: 1, local addr: 109.1.1.1

      access-list azure-vpn-acl extended permit ip 192.168.1.0 255.255.255.0 172.16.0.0 255.255.0.0
      local ident (addr/mask/prot/port): (192.168.1.0/255.255.255.0/0/0)
      remote ident (addr/mask/prot/port): (172.16.0.0/255.255.0.0/0/0)
      current_peer: 13.89.48.98

      #pkts encaps: 5, #pkts encrypt: 0, #pkts digest: 0
      #pkts decaps: 5, #pkts decrypt: 5, #pkts verify: 5
      #pkts compressed: 0, #pkts decompressed: 0
      #pkts not compressed: 0, #pkts comp failed: 0, #pkts decomp failed: 0
      #pre-frag successes: 0, #pre-frag failures: 0, #fragments created: 0
      #PMTUs sent: 0, #PMTUs rcvd: 0, #decapsulated frgs needing reassembly: 0
      #TFC rcvd: 0, #TFC sent: 0
      #Valid ICMP Errors rcvd: 0, #Invalid ICMP Errors rcvd: 0
      #send errors: 0, #recv errors: 0

      local crypto endpt.: 109.1.1.1/0, remote crypto endpt.: 13.89.48.98/0
      path mtu 1500, ipsec overhead 74(44), media mtu 1500
      PMTU time remaining (sec): 0, DF policy: copy-df
      ICMP error validation: disabled, TFC packets: disabled
      current outbound spi: F57DE464
      current inbound spi : 86B603F5

! remaining output omitted
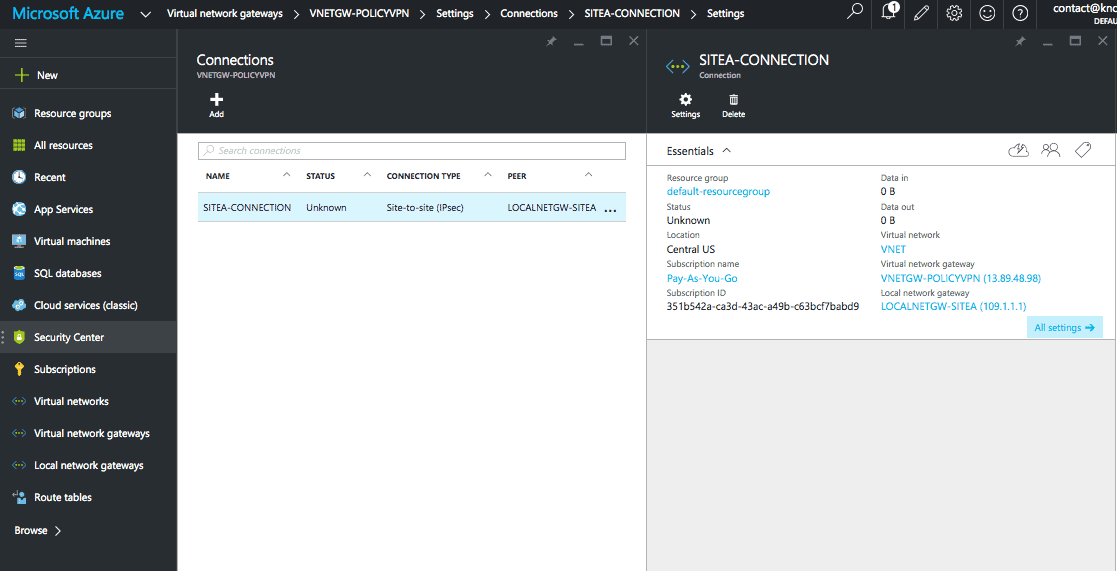
Azure Connection
To show the status and the throughput totals you can click on the connection from within Virtual network gateways > VNETGW-POLICYVPN > Settings > Connections.

- NETCONF & YANG: Automate Network Configs via Python - April 2, 2026
- Palo Alto – How to Configure Your Next-Generation Firewall - April 2, 2026
- How to Harden Linux SSH: Keys, Fail2ban & Ciphers - March 1, 2026
Want to become a certified Azure expert ?
Here is our hand-picked selection of the best courses you can find online:
Microsoft Azure Fundamentals Certification course
Microsoft Azure Administrator Certification course
Microsoft Azure Architecture Technologies course
and our recommended certification practice exams:
Delta Practice Tests