Below will show how to create a basic Remote Access VPN using Pre Shared Keys.
This guide presumes that you already have the Netscren Remote VPN Client installed onto your local machine and was created using the following software versions :
- ScreenOS – 6.2.0r1.0
- Netscren Remote VPN Client – 10.8.3 (Build 6)
Below is an outline of the required steps,
- Create User
- Create Group
- Create Phase 1 Prosposals
- Create Phase 2 Prosposals
- Create Policy
- Configure your Netscren Remote VPN Client
This example will be allowing us to connect to the subnet 192.168.1.0/24 (Trust Interface). Our Client will be connecting to the netscreen on the Untrust interface using the IP address 1.1.1.1.
Create User
- Goto “Objects > Users > Local” Click New
- Create a new user with the following details.
Username: User1
Status: Enable
Click IKE User
Number of Multiple Logins: 1
Click Simple Identity
IKE Identity:
3. Click OK
Create Group
- Goto “Objects | User Groups | Local”
- Create a new usergroup and add your newly created user.
Create Phase 1 Prosposals
- Goto “VPNs | AutoKey | Advanced | Gateways | New”
- Add your “Gateway Name”
- Select “Remote Gateway | Dialup User Group” and choose your group from the drop down menu.
- Click Advanced
- Add your “Preshared Key”
- Add your Outgoing Interface (This will be the interface you are connect your Netscreen from. So normally this will be Untrust)
- Select “Security Level | User Defined | Custom” and choose “pre-g1-des-md5”
- Select “Mode | Aggressive”
- Click Return
- Click OK
Create Phase 2 Prosposals
- Click “VPNs | AutoKey IKE | New”
- Add your VPN Name
- Select “Remote Gateway | Predefined” and choose your previously created gateway from the drop down.
- Select Advanced
- Select “Security Level | User Defined | Custom” and select “g2-esp-3des-md5” from the drop down menu.
- Select Return
- Select OK
Create Policy
- Select “Policy | Policies”
- Select “From Untrust to Trust”
- Select “Dial-Up VPN” for the source address
- Add a new address of “192.168.1.0/24” for the destination address.
- Select “Action : Tunnel”
- Select your Dialup VPN created previously for the Tunnel.
- Select “Position at Top”
- Click “OK”
Configure your Netscren Remote VPN Client
- Launch NetScreen-Remote Security Policy Editor
- Right Click “My Connections” and Select Add
- Name your new connection
- Add the following to the various sections,
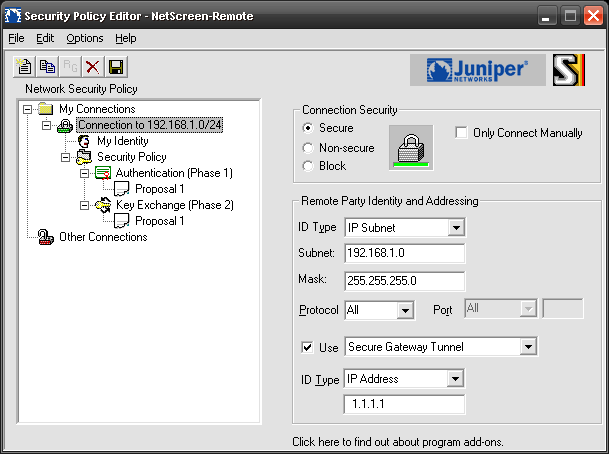
Remote Party Identity and Addressing
- ID Type: IP Subnet
- Subnet: 192.168.1.0
- Netmask: 255.255.255.0
- Click Connect using Secure Gateway Tunnel
- ID Type: IP Address: 1.1.1.1
My Identity
- Select Certificate: None
- ID Type: Email address:
- Click Pre-Shared Key and Enter Key (in this case its netscreen)
- Enter the Pre-shared key netscreen
Security Policy
- Select Phase 1 Negotiation Mode: Aggressive
- Select Enable Perfect Forward Secrecy (PFS)
- PFS Key Group: Diffie-Hellman Group 2
- De-select “Enable Replay Detection”
Authentication (Phase 1)
- Select Proposal 1
- Encryption Alg: Triple DES
- Hash Alg: MD5
- SA Life: Unspecified
- Key Group: Diffie-Hellman Group 2
Key Exchange (Phase 2)
- Select Proposal 1
- Encrypt Alg. Triple DES
- Hash Alg. MD5
- Encapsulation: Tunnel
Click Save
Right click the Netscreen Icon and choose connect.

- NETCONF & YANG: Automate Network Configs via Python - April 2, 2026
- Palo Alto – How to Configure Your Next-Generation Firewall - April 2, 2026
- How to Harden Linux SSH: Keys, Fail2ban & Ciphers - March 1, 2026
Want to become an IT Security expert ?
Here is our hand-picked selection of the best courses you can find online:
Internet Security Deep Dive course
Complete Cyber Security Course – Hackers Exposed
CompTIA Security+ (SY0-601) Certification Complete course
and our recommended certification practice exams:
Delta Practice Tests