Within this article we will configure a basic Anyconnect setup. The Anyconnect client provides the ability to securly connect to your LAN via TLS/DTLS (TLS over UDP). Enable WebVPN asa84(config)# webvpnasa84(config-webvpn)# enable outsideINFO: WebVPN and DTLS are enabled on ‘outside’.asa84(config-webvpn)# anyconnect image disk0:/anyconnect-win-2.5.2014-k9.pkgERROR: The specified AnyConnect Client image does not exist.asa84(config-webvpn)# anyconnect enableasa84(config-webvpn)# exit Create User … Read more
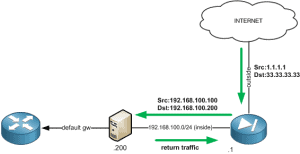
Twice NAT allows you to NAT both the source and destination within a single rule. Scenario A scenario where this type of configuration would be required is shown below. To ensure that any traffic originating from the Internet isn’t sent back out to its default gateway (asymmetrically routed) the source IP is translated to an … Read more
A Certificate Signing Request (CSR) is a base-64 encoded (PEM based) string which is generated using the users public key along with a number of attributes provided by the user such as DN, email, address etc. The CSR is then sent to the CA which it then uses to create a public certificate. The public … Read more
Purpose The purpose of this document is to explain the configuration methods required to assign to a group-policy to a user based on their OU group. Summary The Cisco ASA firewall includes the ability to assign a user to a group policy based on their OU group. This is achieved via the use of the … Read more
Within the Cisco Firewall family (PIX/ASA) there are 2 security features known as Security Levels and NAT Control. Security Levels Security levels are numeric values (between 0 and 100) which are assigned to the firewalls interfaces and used to control traffic flows. Traffic is allowed to pass from a higher security level to a lower … Read more
Issue When running the command ‘show service-policy interface outside set connection detail’ the SSH thread incorrectly tries to access the wrong memory area. This results in the Cisco ASA rebooting. This issue is also referenced within the Cisco caveat CSCtf22329. Solution Upgrade to software version 8.2.5(22).
Within this example we will configure modular policy framework to define a range of connection limits. This provides a basic means of protecting your environment against DoS attacks. Define Traffic First of all we define which traffic the MPF policy will be applied to. In the example below we exclude the host 8.8.8.8 whilst inspecting … Read more
Being that this command is slightly obscure I thought it was worth documenting. To clear the Cisco ASA connection counter the following command is used. cisco-asa(config)# clear resource usage resource conns
Issue When the transport mechnism TCP is configured for Syslog (trap logging) and the Cisco ASA is unable to reach the designated syslog server, the security appliance will prevent any further new network sessions. Solution In order to ensure that the status of a TCP-based syslog server is irrelevant to new sessions the following command … Read more
Issue When configuring IPv6 on an ASA 5505 running 8.2(5) you may experience issues where you are unable to ping (via IPv6) the ASA`s interfaces. Solution Upgrade to version 8.2(5)3.
This example will provide the required configuration to allow a single IP address access to TCP port 80 when the HTTP Host Header matches either EXAMPLE1.DOMAIN.net or EXAMPLE2.DOMAIN.net. Note : In addition to the commands below you will also need to grant the relevant access via your interface based ACL`s. This is because your HTTP traffic … Read more
As we all know Cisco`s new ASA version 8.3 brings massive changes in NAT. This article describes and explains how NAT exemption (no NAT) is now configured. Below provides examples of both pre and post 8.3 no NAT configurations. Example Details Local LAN – 192.168.0.0/24 Remote LAN – 172.168.0.0/24 Traffic is arriving on the inside … Read more
Within this tutorial will will look at 2 configuration examples in which we will use HTTP inspection within the Cisco ASA to allow access for certain hosts based on specific URL headers. EXAMPLE 1 This example will show the required syntax to allow access to yahoo.com for any host within the network 10.1.1.0 255.255.0.0. HTTP … Read more
The prompt state command was introduced within 7.1. This short example shows you how to configure your ASA to include the cluster state within its name : cisco-firewall# config t cisco-firewall (config)# prompt hostname state cisco-firewall/act(config)#
You may find that there is a time in which you haven’t got access via the standard ASAOS CLI to change, amend or edit your current configuration. In this example we will show you the steps required for removing the configuration via ROMMON mode. Here are the steps : 1. Reboot the device2. On boot … Read more
Below are a couple of ASA caputre examples. This is meant for more of a copy and paste function then an overall capture tutorial. access-list based access-list capture1-acl permit ip host [ip] host [ip]capture capture1 type access-list capture1-acl interface [interface] host / port based capture capture2 [interface] match ip host [ip] host [ip]capture capture3 [interface] … Read more
The main issue when creating a Site to Site VPN between parties is having the correct information on both sides. Below is a template for the information which is needed to build a VPN Site to2 Site tunnel. This template is designed to be copied and pasted and sent to the other parties. Please remember … Read more
Below is an example of a basic configuration for an ASA 5505 Firewall. The main difference between the other ASAs is that with the 5505 you have 10 ports which are not assigned to their own bridge groups. So you need to configure you VLANs and then assign you ports to your VLANs. Please Notes … Read more
As you will have heard (and if not you will do soon) the new ASA 8.3 brings massive changes. The main change is the way in which the ASA handles NAT. Below provides a number of Auto NAT examples. Auto NAT is configured using the following steps: Create a network object. Within this object define … Read more