If your like me, and haven’t the time to waste trying to find and delete viruses, then this guide below is a must read.
In this guide we will be securing the use of windows by creating a limited account.
If you’re using a limited account when you visit an attacker’s Web site, it’s less likely the attacker will be able to download and install the program or file that’s necessary to infect your computer. As a result, using limited accounts in Windows XP for daily use can reduce your risk of being the victim of a computer attack.
We will also change a few settings so that you can run and install programs using your admin account without having to log out and log back in as the administrator.
The steps involved will be,
- Create a Limited Account
- Grant access to your desktop clock
- Grant access to the shared folder
- Enable the MSI runas fix
- Disable Remote Registry access
- Create a desktop icon to allow you run the Command Prompt as admin.
Please note that all of the steps above will need to be carried out with administrative permissions.
1. Create a Limited Account
First of all you will need to create a limited account.
- This can be done via Start > Settings > Control Panel > User Accounts
2. Grant access to your desktop clock
When using a limited account it will restrict your access to the desktop clock. To allow any user that is logged in to access the clock you will need to do the following,
- Goto Start > Run and type secpol.msc
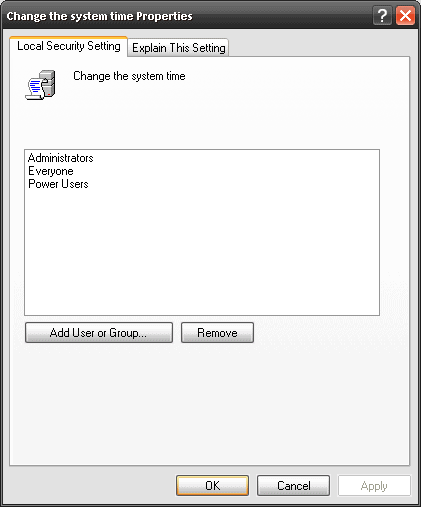
- Goto Security Settings > Local Policies > User Rights Management > Change the System Time
3. Doube click on Change the System Time and add the user INTERACTIVE. This will allow any user logged into windows access to the system clock.
3. Grant access to the shared folder
To allow you to view files between your admin account and you limited account you will need to give yourself access to the Shared Folder.
- Go into My Computer and right click on the Shared Documents folder.
- Select Properties
- And click on the Read Only box so there is nothing inside.
- Then click apply.
- It will ask you if you want to add this to all the sub folders, select ok.

4. Run the batch script
The next 3 steps will be completed via a small batch script that I have made to save us all some time.
The script will do the following,
- Enable the MSI run as fix – So you can install programs as administrator by right clicking on the file from your limited account.
- Disable Remote Registry access – Disable remote registry access.
- Create a desktop icon to allow you run the Command Prompt as admin – Creates a bat file to allow you to run the Command Prompt ad the administrator. This is useful if you need to make changes to the registry or changes to the group policy.
The file can be downloaded here. You will need to unzip the whole folder, and run the bat file from within the folder.

- NETCONF & YANG: Automate Network Configs via Python - April 2, 2026
- Palo Alto – How to Configure Your Next-Generation Firewall - April 2, 2026
- How to Harden Linux SSH: Keys, Fail2ban & Ciphers - March 1, 2026
Want to become a Windows expert?
Here is our hand-picked selection of the best courses you can find online:
Windows Server 2022 Administration course
Windows 10 Troubleshooting course
and our recommended certification practice exams:
Delta Practice Tests