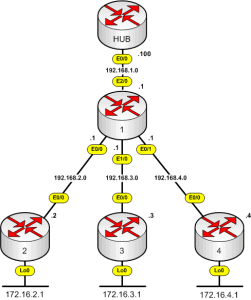
Introduction With this article, we will look at the basic commands used within Cisco IOS to configure OSPF. Basic Configuration To initially configure OSPF, at a minimum, you must configure three things – process ID, router ID, and the network. Process ID – Defines the OSPF process ID that OSPF will run under. This is … Read more
Introduction First of all, what is a route leak? A route leak is the propagation of routing announcement(s) beyond their intended scope – RFC7908 Within this article we will look at 2 methods of route leaking within an MPLS environment – static routes and route maps. To demonstrate both methods we will look at 2 … Read more
Introduction Within this article we will walk through the various steps required in configuring MPLS. NOTE This article does not look to explain the various terms and concepts of MPLS, for details around these please see Getting to Know MPLS. Overview Within our example we will have 2 customers COSTA and STARBUCKS. Each customer consisting … Read more
Introduction Cisco Express Forwarding (CEF) is a packet-switching technique used within Cisco routers. The main purpose of CEF is to optimize the forwarding of packets and increase the packet switching speed. History Prior to CEF there were 2 methods for packet-switching – Process- Switching and Fast-Switching. Process-Switching The first method, process-switching is the oldest and … Read more
In order to adjust the MSS of your traffic on a vRouter, also known as MSS clamping, a policy route is defined. Once the policy route is created it is then assigned to the outside interface. MSS Clamping is typically used for IPSEC based traffic to ensure that traffic does not exceed the MTU of … Read more
Within this article we will show you how to create an IPSEC site to site VPN from a Vyatta vRouter into the AWS cloud. Due to the nature of AWS VPNs, explained further on a tunnel based VPN will be created. The main difference with a route based VPN is that a tunnel interface (VTI) … Read more
Within this article we will show you how to create a firewall policy for a Brocade Vyatta router. Firewalls policies are created much like any other device, using a combination such source IP , destination IP etc etc. Once created it is then applied to an interface. Group Types There are 3 types of groups they are … Read more
Issue When using the WebUI you may experience random disconnects.. Solution This is due to a bug VSE-7850. This is fixed within 6.6R4. The other work around is to disable the WebUI and make all configuration changes via the CLI.
Purpose The purpose of this document is to explain the various steps required in configuring a remote access VPN on a Vyatta appliance. Vyatta Configuration The Vyatta configuration steps are pretty straight forward. You enable the outside interface with IPSEC, the IP pool, along with the secret passphrase and usernames and passwords, then your good … Read more
Introduction Within this article we will look at the various way to configure NAT on a Vyatta appliance. To configure NAT source and destination rules are defined using the ‘set nat source’ and ‘set nat destination’ commands. The source rules relate to the translation of the source address, and the destination rules relate to the … Read more
Issue When trying to access the GUI you may observe the following error, Username or password is incorrect.Failed to parse server data. Solution This is due to a bug with VSE 6.5 R2. Which is caused by the Vyatta Appliance not having an interface named ‘eth0’ present. To resolve this, Edit the file ’/config/config.boot’ via … Read more
In order to secure management access you will need to A) enable the firewall and B) create a firewall policy and assign this to your management interface. Enable Firewall First of all enable the firewall. set firewall set firewall state-policy related action accept set firewall state-policy established action accept set firewall state-policy invalid action drop … Read more
Within this article we will show the necessary steps required to build a site to site IPSEC VPN. The following example consists of the following encryption domain: Local Remote Peer 2.2.2.2 1.1.1.1 Endpoint 192.168.3.0/24 172.16.0.0/16 NAT First of all 2 NAT rules are configured to ensure the traffic is not NAT`d. set nat source rule … Read more
Flow accounting provides the ability to display statistics on your network traffic. And is defined on a per interface basis. Below shows you a quick summary on how to enable flow accounting and also how to view the statistics. Enable First of all flow accounting is enabled on each of the interfaces. vyatta@vyatta# set system … Read more
Introduction DMVPN (Dynamic Multipoint Virtual Private Network) is a feature within the Cisco IOS based router family which provides the ability to dynamically build IPSEC tunneling between peers based on an evolved iteration of hub and spoke tunneling. DMVPN uses a combination of the following technologies : Multipoint GRE (mGRE) Next-Hop Resolution Protocol (NHRP) Dynamic … Read more
Below shows the configuration for one side of a Site to Site VPN between 2 Cisco routers using pre-shared keys. router(config)# crypto isakmp enable Phase 1 router(config)# crypto isakmp policy 10 router(config-isakmp)# authenticaton pre-share router(config-isakmp)# encryption [?] router(config-isakmp)# group [?] router(config-isakmp)# hash [?] router(config-isakmp)# lifetime 86400 router(config)# crypto isakmp identity address router(config)# cryption isakmp [key] … Read more
Reflective access-lists allows the router to pass “established” tcp traffic that has been previously allowed via another ACL. Due to routers to not having (by default) a state table, this ensures that you do not have to create additional access list entries to allow the return traffic of a permitted tcp session. (config)# ip access-list … Read more
In a worst case scenario someone could gain access to your router, clear the boot image and config. This would result in a lengthy down time and a lot stress. Cisco have tried to address this but the use of the following commands which prevents the clearing of your config and boot image (config) # … Read more
Below shows a number of commands that you can use for securing your Cisco router. Block Denied Logins – Useful for delaying denied logins when someone is trying to brute force your router. (config)# login block-for [seconds] attempts [attempts] within [seconds] Quiet Login – Allows you to still login once the router has blocked login … Read more
CLI Views allow your to to create sub administrator within your Cisco device. This can also be thought of as an extension to privilege levels, giving you further granularity over what your users are allowed to do. Creating views Below shows you the commands required to create a view mode. In all the examples we … Read more